
Zoom has a variety of options for creating closed captioning in your meetings and webinars, which provides subtitles of the spoken in-meeting communications. This may be used for participants to more easily follow the conversations, or to meet accessibility requirements for families or students who are hard of hearing (HH) or deaf.
I. Starting manual closed captioning or live transcription in a meeting
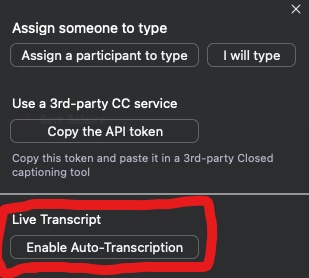
- Zoom meeting or webinar that you are hosting, click Live Transcript
 .
. - Choose Enable Auto-Transcription. This allows Zoom to start providing live transcription. Participants will be notified that this service is available. This option is only available if enabled in web settings.
- You can change the "Subtitle Settings" by selecting the ^, to increase the font size.
- Auto live transcription will appear at the bottom of the meeting window.
Note: The "Live Transcription" feature has limitations to take note of. Live transcription currently only supports English and the accuracy of the feature depends on many variables, such as but not limited to:
- Background noise
- Volume and clarity of the speaker’s voice
- Speaker's proficiency with the English language
- Lexicons and dialects specific to a geography or community
II. Entering closed captions as a participant in Breakout Rooms
The Auto-Transcription service is not available in Breakout Rooms (as of May 19, 2021). If you're the meeting host, we recommend using a third-party closed captioning service if you want closed captions in breakout rooms. For more information, please see Zoom Help: Closed captioning and live transcription in Zoom
0 Comments